Step 1: Open Apple Mail and Start the Setup
- Launch Apple Mail on your Mac.
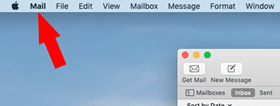
- In the top left corner of your screen, click on Mail in the menu bar.
- From the dropdown, select Add Account.
Step 2: Choose Account Type
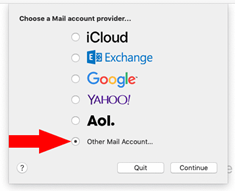
- In the Add Account window, select Other Mail Account from the options.
- Click Continue.
Step 3: Enter Email Settings
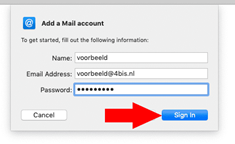
- Enter your email address and password.
- Click Sign In to continue.
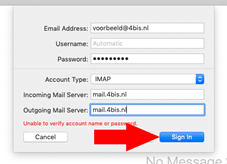
- Ensure that the Account Type is set to IMAP. If not, select it from the dropdown menu.
- For the Incoming Mail Server, enter:
mail.4bis.nl - For the Outgoing Mail Server, enter:
mail.4bis.nl - Click Sign In again to proceed.
Step 4: Customize Your Preferences and Finish
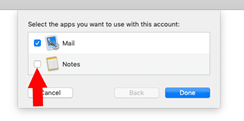
- You can choose to sync additional services with your email account, like Notes. Check the box next to Notes if you want to use it, or uncheck it if you don’t.
- Click Done to finish the setup.
Your email account will now be added to Apple Mail, and you can start using it immediately. You’ll find your new email in the left column of the Mail app.
Conclusion
Congratulations! You've successfully added your email account to Apple Mail. Follow these steps to easily send and receive emails on your Mac. If you face any issues, double-check your server settings or contact support for assistance.
